_820_828_s_c1.jpg)
Card making How to Papercraft Papercrafter Techniques Card Making Projects
Honeycomb paper not only adds texture and dimension to your designs, but also a sense of fun! This on-trend technique may seem complicated, but it’s surprisingly incredibly easy to achieve with limited supplies in just nine easy steps. PaperCrafter designer, Colette Smith simply layers tissue papers in bright and bold colours to create a cheerful rainbow effect, ideal for birthdays or a simple hello!
_820_828_s_c1.jpg)
YOU WILL NEED:
Craft essentials
Templates from papercraftermagazine.us
Tissue paper: red, orange, yellow, green, blue, indigo, purple
Stamps, sentiments
Ink pad, black
Fine liner, black
• 1.Download, print and the glue placement templates A and B from our website and cut out. Trim eight sheets of red tissue paper to 6cm x 10cm

• 2.Lay a piece of tissue paper onto template A and use the marker lines as a guide to add thin strips of glue

• 3.Place another sheet of tissue paper over the first and press down firmly

• 4.Lay the tissue paper onto template B and glue across the marked lines

• 5.Continue with the alternate layers of glue until all eight sheets have been used. Trim the remaining six colours of tissue paper into eight 6cm x 10cm and glue into place

• 6.Fix a 6cm x 10cm panel of card to the front and back of the stack of tissue papers and trim the left side

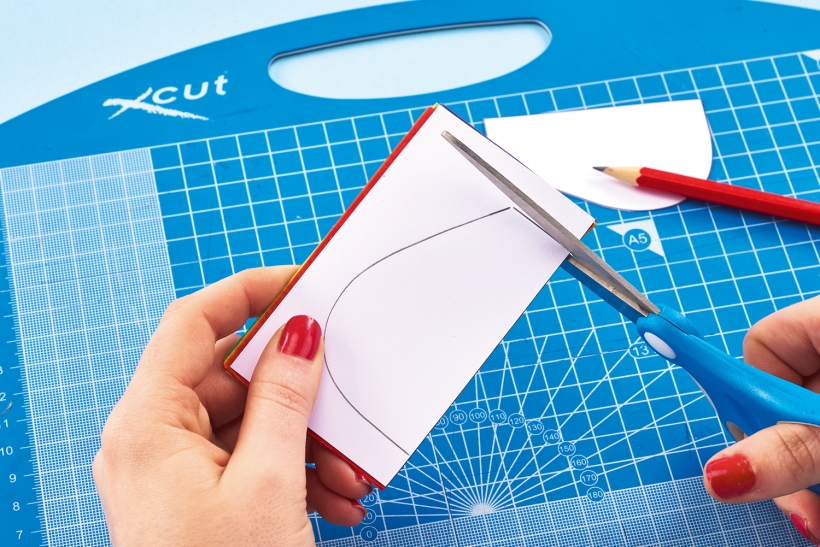
• 7.Download, print and cut out the balloon and basket templates from our website. Lay the straight edge of the balloon along the left edge of the tissue papers. Draw around in pencil and cut out

• 8.Add clouds, a sun and a simple sentiment to the inside of a 10.5cm x 14.5cm blank. Adhere the balloon to the centre, lining up with the fold

• 9.Cut out and score the basket from brown card and stick to the centre of the blank, in line with the centre fold. Draw the ropes with a black fine liner and decorate the front of the card with clouds and a sun


YOU WILL NEED:
Old books
Die, circle
Wooden skewer
Binder clips
Alcohol marker, orange
Adhesives: PVA glue, glue stick
Die-cutting machine

METHOD:
1. Use a circle die to cut lots of discs from book pages. Fold each circle in…
Halloween crafts Home decor Home decorations How to Papercraft Papercrafter Revamping Techniques Projects

Whilst this may look like a paper cutting that took hours to create, it really couldn’t be any easier. Our talented designer Corinne Bradd has created 15 templates for you to…
Die cutting Home decor Home decorations How to Papercraft Papercrafter Projects

You Will Need:
Templates or SVG files
Brother ScanNCut SDX1200 (optional)
Strong card
Cardstock, various colours
Jute yarn
PVA glue
Autumnal Display
1. Draw a 25cm wide circle on strong card, then draw a concentric 17cm wide circle…
Home decor Home decorations Papercraft Papercrafter Techniques

Shadow box cards, otherwise known as tunnel greetings or diorama cards, are designed to transport the recipient to picture-perfect backdrops in an instant. In this case, PaperCrafter designer Francesca Vignoli…
Birthday crafting Card making Die cutting How to Stamping Techniques Card Making
NO SPAM
Just pure crafty goodness!
YOU CAN REGISTER WITH US TODAY OR CHECK OUT THE MEMBER BENEFITS YOU CAN GET YOUR HANDS ON

Not only will you receive our amazing newsletters packed with the latest projects, exclusive giveaways and freebies, you’ll also get your hands on all of this...
View the benefits
All of our offers will be delivered straight to your inbox - they’re only a click away!
Show me the next benefit...
Get access to loads of free printables and downloads at your fingertips.
Show me the next benefit...NO SPAM
Just pure crafty goodness!
NO SPAM
Just pure crafty goodness!


